You’ve looked for a quick way to create subtitles for your video and came across Aegisub?
Aegisub is indeed a great tool to make subtitles by yourself. Yet, when you’re starting it, it’s more difficult to handle. With numerous features, it’s not easy to find your way around.
Fortunately, at Cheksub, we know Aegisub very well. So we’ll teach you how to use it and to quickly add subtitles to your video. Let’s go ! ????
Table of Contents
How to add subtitles in Aegisub?
You have just downloaded the latest version of Aegisub and you’re confused by the lack of indication on the interface. Don’t worry ! We’ll explain to you how to proceed in 5 precise steps:
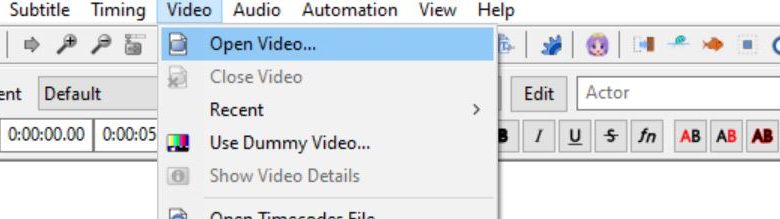
1. Open your video or audio in Aegisub
To do this, click on “Video” in the top banner, then “Open the video….”. The software supports a wide range of video formats, but you should use the classic Windows formats such as MP4, DivX, and others. The same goes for audio formats.

2. Import your written transcript into the software
Aegisub does not have built-in speech recognition. So you will have to transcribe the sound of your video by yourself. Fortunately, it is easy to copy/paste your transcript from a text editor to the software. Just copy it to the text grid :

3. Open the Timecode editor
Now that you have your text, you need to define the timing display in your video. To manage the timecode, direct your eyes to the timecode editor on the right. Press the green and blue “spectrum analyzer mode” icon to display the different audio zones of your content.

4. Managing the time sequences of your subtitles
In the editor, you need to accurately select the time sequences for each of your subtitle lines. Left-click to start and end a sequence, and make sure to match the green audio areas. Click on the validation symbol to assign this sequence. You can automate validation by clicking the auto validation icon. This will help you go much faster.

Make sure you don’t have too many characters per sequence (CPS) or that you don’t cut another sequence. At the end, your subtitles should look like this:

5. Save and export your file as .srt or .ass
All that’s left to do is to use the same technique throughout your video. When you think you’re done, do a final playback to make sure that the synchronization is optimal and that your users have time to read your subtitles.
To make your subtitles usable, you then need to transform them into an .srt file (a very common subtitle format). To do this, press “File” -> “export subtitle” at the top and save it as a .srt file. You can then add it and play it on video players like VLC or Youtube.

Another option is to save it as the native Aegisub ass. file. It contains more information (font, positioning) than the .srt file, even though it is not supported by all video players. But there is another way to do it that I will describe next.
How to edit the style of my subtitles and encode it in my video?
Aegisub not only enables you to create your subtitles, but it can also edit and customize them.
To do this, start by increasing the size of your video ideally up to 75%. Then open Aegisub’s style editor by clicking on “Edit”. You can then manage the formatting, font size, and translation of your subtitles.

You can also change the positioning with the slider on the left :

To keep these settings in your video, you need to encode your subtitles in your video. For example, you can transcode your video in VLC by following those steps :
- Save your subtitles in the Aegisub .ass format.
- Open the VLC software and click on media > play
- Choose your video and select add a subtitle file by taking your ass file.
- Click “Stream”, then “Next”, then choose “File” and name your video.
- Click “Next” and choose the profile of your video. Then check “transcode video” and press the small wrench, go to the subtitle tab and check the two boxes “subtitles” and “overlay the subtitles on the video”.
- Press “Next”, then “Stream”.
VLC will then encode your subtitle in the video according to your settings.
Create automatic subtitles 8 time faster.
Aegisub: some advice to make quality subtitles
To create truly engaging subtitles, there are a number of conditions to follow according to the official BBC guidelines :
- Don’t exceed 70 characters per subtitle. Divide the sentence into two equal parts
- Your subtitle sequences should be between 1 and 6 seconds long to ensure comprehension.
- Subtitles are usually positioned in the center and bottom. But sometimes they may hide information and need to be moved.
- Start your sequences exactly when the speaker starts speaking. If speakers speak fast, you may want to try editing the words a little or allow a little more time for reading.
- When it comes to translation, adapt the difference in length depending on the language.
- Think about the language register, cultural differences, and also be observant and understanding of the scenes you transcribe. Context can help in understanding some difficult sentences.
Why use an automatic subtitle solution instead?
If you now handle Aegisub very well, why break the fun by using an automatic subtitle app?
First of all, automatic solutions can increase your productivity in a very significant way. Voice recognition software takes away the task of listening and converting sounds into text. What’s more, they automatically detect time sequences and match them to your texts. So, most of the work is already done. All that remains is to correct and adapt the text blocks.
Also, it can greatly improve your workflow for larger projects. Working on long content or a large amount of video requires a flawless workflow. Solutions like Checksub provide just that: a collaborative tool where everyone can work together and contribute.
At Checksub, we have created a high-performance subtitling tool that brings together all these features in an online and easy-to-use solution:
- the best speech recognition and machine translation APIs to analyze your video
- A powerful and very easy to use online transcription editor
- A collaborative platform for working with translators, clients, and other partners
How it works :
- Upload your video
- Indicate the original language and the languages you wish to obtain (there are 128 languages in all).
- Check the result
- Export the written transcript file and do whatever you want with it.
Level up your productivity by trying our online subtitling solution today!